环境
win10专业版,64位
准备工作
注册
github账号下载安装
git for windows,我用的是Git-2.18.0-64-bit一路
next就好验证安装:任何位置鼠标右击出现
Git Bash Herecmd下1
git --version
下载安装
node.js,我用的是node-v10.7.0-x64验证安装:
cmd下1
node -v
npm会默认安装
创建仓库
在github上新建仓库New repository
注意,仓库命名格式必须是 yourname.github.io (yourname是你的github用户名)这就是以后访问的博客网址
注册的邮箱一定要验证,否则不会成功
仓库创建成功不会立即生效,需要过一段时间,大概10-30分钟
配置SSH key
用于本地与github数据交换
生成并配置key
执行如下命令
1
2
git config --global user.name "xxx" #你的github用户名
git config --global user.email "xxx@qq.com" #填写你的github注册邮箱生成
ssh密钥1
2cd ~/. ssh #检查本机已存在的ssh密钥
ssh-keygen -t rsa -C "邮件地址" #生成密钥连续按回车三次(使用默认
ssh密钥生成策略),密钥生成成功,存于本地用户目录(~),打开.ssh\id_rsa.pub文件,并复制其中内容打开你的
github主页,进入个人设置->SSH and GPG keys->New SSH key:title任意填写,将内容复制到key中即可
测试ssh
本地执行
1 | ssh -T git@github.com #注意邮箱地址不用改 |
如果提示Are you sure you want to continue connecting (yes/no)?,输入yes,然后会看到:
Hi xxx! You’ve successfully authenticated, but GitHub does not provide shell access.
看到这个信息说明SSH已配置成功!
使用Hexo
以下所有命令建议在git bash下运行
安装
1 | npm install hexo-cli -g |
验证安装
1 | hexo -v |
初始化
在本地主机上建立一个hexo文件夹,用于日后代码,博客的存放
进入此目录
1 | hexo init |
此目录会自动生成hexo相关文件
注:此处目录中会存在一个_config.yml的文件,为hexo的主配置文件,以后我们称其为站点配置文件
本地预览
hexo目录中执行
1 | hexo g #生成静态页面 |
执行命令后,hexo会在public文件夹生成相关html文件,用于本地预览与后期提交github
浏览器访问http://127.0.0.1:4000,即可看到hexo默认生成页面hello,world
写博客
进入hexo根目录
1 | hexo new 'my-first-blog' |
‘ ‘中为你本篇博客的名称,执行完成后,会自动在\hexo\source\_posts\目录下生成.md文件,
只要打开这个文件就可以写博客了
上传到github
上传前的配置
配置站点配置文件_config.yml中的deploy部分:
1 | deploy: |
安装上传插件
1 | npm install hexo-deployer-git --save |
上传文件
在hexo根目录下
1 | hexo d |
会将有所改动的内容全部提交至github
常用hexo命令
1 | hexo new "postName" #新建文章 |
更改默认hexo主题及优化
hexo与next目录结构
hexo目录结构
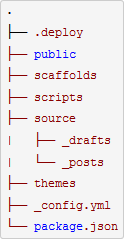
deploy:执行hexo deploy命令部署到GitHub上的内容目录
public:执行hexo generate命令,输出的静态网页内容目录
scaffolds:layout模板文件目录,其中的md文件可以添加编辑
scripts:扩展脚本目录,这里可以自定义一些javascript脚本
source:文章源码目录,该目录下的markdown和html文件均会被hexo处理。该页面对应repo的根目录,404文件、favicon.ico文件,CNAME文件等都应该放这里,该目录下可新建页面目录。
drafts:草稿文章
posts:发布文章
themes:主题文件目录
_config.yml:全局配置文件,大多数的设置都在这里
package.json:应用程序数据,指明hexo的版本等信息,类似于一般软件中的关于按钮
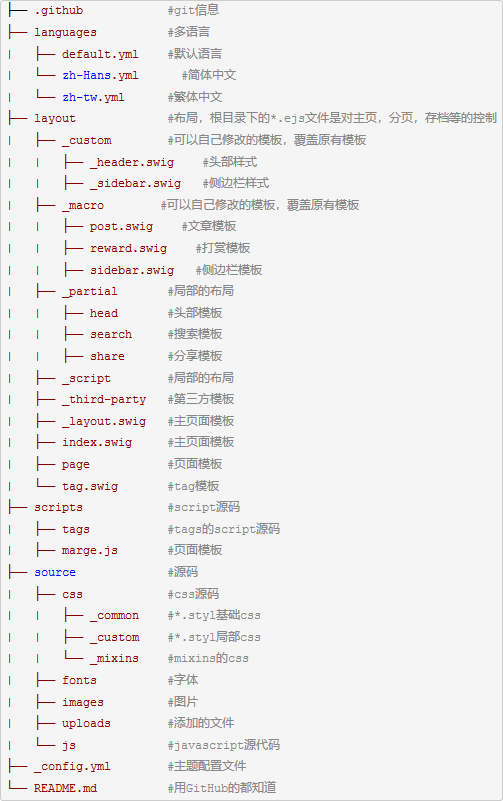
next主题目录结构
主题下载
进入hexo根目录
执行
1 | git clone https://github.com/iissnan/hexo-theme-next themes/next |
执行完成后会在hexo\themes\目录下生成next目录
next目录下也会存在一个_config.yml文件,这是next主题的主配置文件,以后我们称为主题配置文件
主题应用
配置站点配置文件
寻找theme字段,将其值修改为next(next前后都有一个空格,否则会报错)
主题预览
执行
1 | hexo clean #清除缓存 |
浏览器访问http://127.0.0.1:4000查看效果
主题简单优化
设置布局
主题配置文件中
寻找Scheme字段,next提供三种默认主题布局,将你想使用的布局取消注释即可
1 | #scheme: Muse |
- Muse - 默认 Scheme,这是 NexT 最初的版本,黑白主调,大量留白
- Mist - Muse 的紧凑版本,整洁有序的单栏外观
- Pisces - 双栏 Scheme,小家碧玉似的清新
设置显示语言
站点配置文件中
寻找language 字段,设置其值为
1 | language: zh-CN |
语言文件位于hexo\themes\next\languages目录下
设置菜单
主题配置文件中
寻找menu字段
1 | menu: |
除主页与归档页外,其余页面需要手动创建
每行中||后的内容为指定此menu的图标
添加标签页
新建页面
进入hexo根目录
1 | hexo new page tags |
命令执行后,hexo\source\tags目录中生成index.md文件
设置页面类型
修改此index.md文件为(添加type行)
1 | --- |
设置具体博客文章tags
对于hexo\source\_post目录下具体博客文章设置tags(设置tags行)
1 | --- |
添加分类页面
新建页面
进入hexo根目录
1 | hexo new page categories |
命令执行后,hexo\source\categories目录中生成index.md文件
设置页面类型
修改此index.md文件为(添加categories行)
1 | --- |
设置具体博客文章categories
对于hexo\source\_post目录下具体博客文章设置categories(设置categories行)
1 | --- |
添加关于页面
添加页面
进入hexo根目录
1 | hexo new page about |
命令执行后,hexo\source\about目录中生成index.md文件
修改index.md文件
1 | --- |
设置站内搜索
进入hexo根目录
1 | npm install hexo-generator-searchdb --save |
站点配置文件中添加
1 | search: |
hexo 首页文章只显示一部分
在博客文章适当位置添加<!--more--> 标记即可
网站底部字数统计
进入hexo根目录
1 | npm install hexo-wordcount --save |
hexo\themes\next\layout\_partials\footer.swig文件中末尾添加
1 | <div class="theme-info"> |
修改文章底部的带#号的标签
修改hexo\themes\next\layout\_macro\post.swig文件,搜索rel="tag"># ,改为<i class="fa fa-tag"></i>
在每篇文章末尾统一添加“本文结束”标记
在hexo\themes\next\layout\_macro目录下,新建passage-end-tag.swig ,并添加如下内容
1 | <div> |
接着打开hexo\themes\next\layout\_macro\post.swig文件,在post-body 之后添加
1 | <div> |
打开主题配置文件,在末尾添加
1 | # 文章末尾添加“本文结束”标记 |
主页文章添加阴影效果
打开hexo\themes\next\source\css\_custom\custom.styl文件,添加代码
1 | // 主页文章添加阴影效果 |
设置网站图标
在EasyIcon(http://www.easyicon.net/)中找一张(32*32)和一张(16x16)的ico图标,或者去别的网站下载或者制作,并将图标名称改为favicon32x32.ico和favicon16x16.ico,然后把图标放在hexo\themes\next\source\images里,并且修改主题配置文件:
1 | icon: |
实现统计功能
进入hexo根目录
1 | npm install hexo-wordcount --save |
主题配置文件中,添加代码
1 | # Post wordcount display settings |
设置侧边栏
主题配置文件中
设置侧边栏在左侧或右侧
1 | sidebar: |
设置侧边栏显示时机
post- 默认行为,在文章页面(拥有目录列表)时显示always- 在所有页面中都显示hide- 在所有页面中都隐藏(可以手动展开)remove- 完全移除
1 | # Sidebar Display, available value (only for Muse | Mist): |
修改``代码块样式
打开\themes\next\source\css\_custom\custom.styl,向里面加入
1 | // Custom styles. |
博客中添加视频
可以将视频上传视频网站,添加外链
1 | <iframe |
修改博客背景图片
在
hexo\themes\next\source\images路径下添加自定义背景图片修改
hexo\themes\next\source\css\_custom路径下custom.styl文件,添加
1 | body { |
修改主页文章框过高问题
问题如下
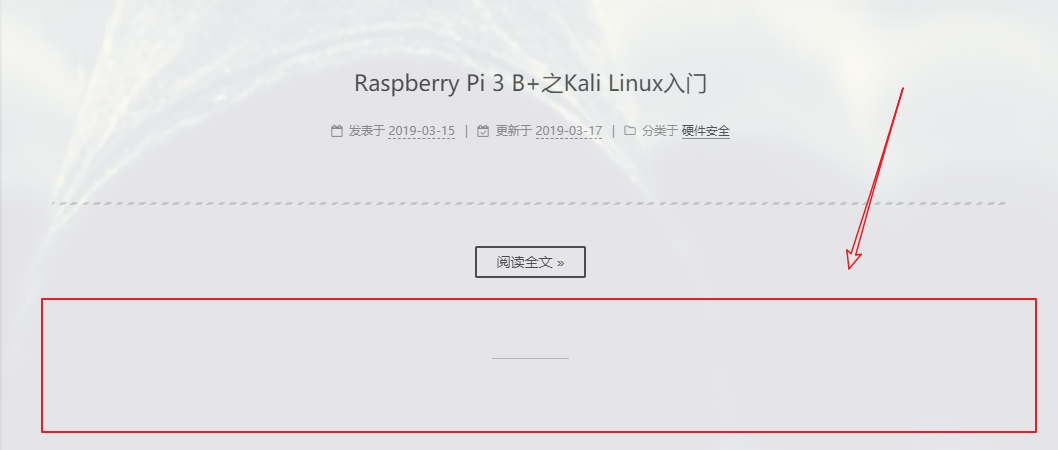
如图所示,红框部分无用,且占用太多空间
解决:
hexo\themes\next\source\css\_common\components\post路径下的post-eof.styl文件,注释掉此串代码即可
1 | .posts-expand { |
修改博客加载动画
/themes/next目录下,打开Git Bash,安装Progress module
1 | git clone https://github.com/theme-next/theme-next-pace source/lib/pace |
安装完成后在/themes/next/source/lib查看会看到pace文件夹
在/themes/next/_config.yml中设置
1 | pace: true #设置为true |
设置返回顶部按钮显示百分比
主题配置文件中
1 | # Scroll percent label in b2t button. |
增加代码复制功能
主题配置文件中
1 | # Add copy button on codeblock |
实现博客中点击图片放大效果
添加插件
进入
/hexo/themes/next/source/lib目录中1
git clone https://github.com/theme-next/theme-next-fancybox3 fancybox
编辑主题配置文件
1
2
3修改为
fancybox: true
访问线上博客
执行
1 | hexo clean |
浏览器访问https://yourname.github.io (yourname是你的github用户名)
绑定域名
若你觉得github的域名配不上你的王霸之气,那么也可以购买域名进行绑定
国内的话,去阿里云或者腾讯云买个域名就不错,也非常便宜
设置域名解析
ping一下你的博客域名,获取其IP地址
在阿里云或腾讯云设置域名解析
1 | 记录类型 主机记录 解析线路 记录值 |
设置github部分
进入hexo\source目录,创建CNAME文件(无后缀名),添加你购买且解析的域名(完整域名,但不包含http://)
上传
进入hexo目录
1 | hexo clean |
即可使用自定义域名访问博客,并且原博客域名也不会失效
错误
首次更新博文,页面404
可能原因
仓库名称未按照格式命名
命名格式:
yourname.github.io(yourname是你的github用户名)index.html丢失安装插件
1
2
3
4
5
6
7
8
9
10
11
12
13npm install hexo-generator-index --save
npm install hexo-generator-archive --save
npm install hexo-generator-category --save
npm install hexo-generator-tag --save
npm install hexo-server --save
npm install hexo-deployer-git --save
npm install hexo-deployer-heroku --save
npm install hexo-deployer-rsync --save
npm install hexo-deployer-openshift --save
npm install hexo-renderer-marked@0.2 --save
npm install hexo-renderer-stylus@0.2 --save
npm install hexo-generator-feed@1 --save
npm install hexo-generator-sitemap@1 --save
参考连接
https://www.cnblogs.com/liuxianan/p/build-blog-website-by-hexo-github.html
http://theme-next.iissnan.com/getting-started.html
https://www.cnblogs.com/syd192/p/6074323.html